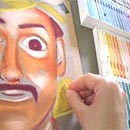
Before discussing how to get a pastel ready for picture framing, we should explain what these are. Pastels and charcoals are drawn or painted with short sticks or chalks which are friable media. Friable means a powdery  or crumbly and otherwise loose and unstable medium. In fact, if you happen to accidentally touch a pastel or charcoal, chances are that you will smudge it and that some of the medium will come off and stick to your hand. Therefore it is important to safeguard the artwork from accidental touching, smudging, other contact or pressure damage. If needing to temporarily store or transport a pastel or charcoal, gently place it between 2 sheets of waxed paper and always carry the artwork face up.
Do not move, squeeze or slide the wax paper across the art or it might smudge. For practical protection, apply or spray the artwork with a workable or non-workable fixative. These are sold by a number of well-known, reputable, artists' supplies brands such as Micador, Daler Rowney, etc. While the different products, brands or merits or demerits of different fixatives are beyond the scope of this post, they all work in much the same way.
And that is that they create micro-thin, flexible, layer from a (usually) alcohol-based, hydrocarbon-propelled, liquid varnish. While some artists point-blank refuse to fix their art because they feel that doing so alters or darkens the colours or the tones of their work, many find it very convenient and practical to do so. In fact, fixing these types of art with fixatives is just about the only way that these can be stabilized enough for handling, display and picture framing. Most picture framers won't frame a pastel or even a charcoal unless the art has been fixed or sprayed first.
And don't think that framers are being fussy, lazy or picky. Unless these types or art is sprayed or fixed, the art's window mat is almost guaranteed to get dirtied by pastel or charcoal specks, flecks or dust falling off the art paper and down the gaps between the glass and the matboard. And when that happens the only way to clean a dirty mat is to de-frame the picture frame, clean the mat (if it can cleaned) and re-fit the frame up, may be about 1 hour's extra work for the average piece.
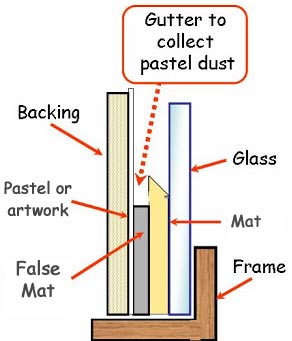
When picture framing these loose media, such as pastels and charcoals, these will need to be framed differently from posters or photos. In particular, what framer call a 'false','hidden' or 'under' mat (or even a spacer) needs to be cut and fitted under the top mat or mats. This mat is cut a little larger than the top mat and inserted underneath the top mat so that it will not be seen. The theory, as well as the practice, is that the added gap, space of thickness of a false mat forms a 'gutter' which will 'catch' any unwanted specks, fleck or dust so that these stay unseen and without dirtying the top, or visible mat.

While this mounting variation isn't the perfect silver bullet, it does help to minimize this problem. By the by, framing a charcoal or pastel without a mat is a no-no and, and unless specifically instructed by customers to do so or to use special spacers, do so, is not a practice we practise. Mouldings for these types of picture frames also tend to be somewhat deep because of the extra mats and foamboards which are often required.
Naturally, most if not all boards and materials used in these frames should be of museum grade or conservation quality though it is really up to customers whether or not they want to pay the extra expense for the extra protection. Hinging the art ought to be with good quality acid-free or conservation hinging tape. The hinges are usually constructed by the S-hinge method, thus hinging the art to the backing board rather than to the underside to the mat as with other works on paper.
Glazing can be either plain or museum-quality but not non-reflective or diffused glass since the refraction loss (clarity versus dullness) can be as high as 15%. Glazing with plexiglass or perspex is inadvisable. This is because all plastic can generate static electricity which, with time, which can become strong enough to disturb or break the surface of the pastel or charcoal drawing. When fitting up the picture frame for a pastel or charcoal, many picture framers push and screw rather than hammer in brads, nails, staples, hangers and bumpers.
Fitting up a picture frame is always done with the art facing downwards and experience has shown even gently hammering a brad into a frame may dislodge pastel particles off the artwork and onto the glass and thence onto the mat, dirtying it. Lastly, when you've finished fitting up the picture frame and need to either give it to the customer or transport it, be very, very gentle, and treat the picture frame as you would a carton of eggs.
Always keep the framed art face up until it is ready to be hung. Avoid even gently rocking, rolling, bumping, hitting, shaking, vibrating or dropping the finished or fitted picture frame. Doing so may dislodge some pastel thereby soiling either the glass or the mat and necessitating a time-consuming and expensive de-framing, cleaning and re-fitting! Lastly, pastels are original art and as such it is desirable to these be framed by the conservation method, at the very least.
We add this as a postscript because we occasionally have to decline the occasional Customer who wants us to frame their pastels in ready-made picture frames to save on custom picture framing costs. Further information on conservation picture framing may be found at our Picture Frames and Art Care page.


While this post is quite valid and good there’s another method of picture framing charcoals and pastels which I use. I don’t use any false mats or under-mounts or mats. I just make 20mm high foamboard spacers to sit between my artwork and the glass which looks really cool. It also givers my work a kind of 3-dimensional effect and enables me charge more. It is a bit fiddly but after I did a few frames likes this it became easier and quicker to do them.
I never spray my pastels anymore with final fixatives because, in the past, each time I’ve done it, even with different brands, I found that ny warm, light colours’ tonalities were affected and became darker, duller and murkier. What I do do now is use a workable fixative which does not alter my pastel colour tones as much as the non-workable, final fixative. This works much better for me and allows me to monitor both the pastels’ and the fixative’s final tones. It also fixes the friability of my pastel so that my picture framer doesn’t complain as much when making a picture frame!
I’ve been pastelling for years now and I’ve gradually come around to the view that it’s really best to spray or somehow fix pastels before framing them. For my pastels I use the Sennelier Charcoal & Graphite Fixative. I just grew tired of de-framing and re-framing my pastels just to clean the dust stuck in between the window mat and the picture frame glass. I also found that I was scratching, scuffing the picture frames while or in the process of doing all this.