Looking at the image here, who hasn’t ever asked him or herself, how to hang picture frames straight and level in their homes or office? It would be fairly safe to say: no one, because just about everyone we know of  has had to deal with this issue at one time or another. It has to be one of life’s great small annoyances, especially when or if you're having visitors at home. Why this happens has to to with physics. The natural elements, everyday events and happenings can transmit, impart or exert unseen, but real, forces. A gust of wind via a doorway left open will most likely be string enough to move a photo frame on a wall. A running child’s footsteps along a corridor’s timber floor with will cause vibrations which will travel up to a wall and move an oil painting frame. A vacuum cleaner being used to vacuum floors will also generate vibrations strong enough to be propagated up to the walls and cause picture frames to move along their hanging wires or cords. On that point it is worth remembering that this problem generally arises with custom picture frames, rather than ready-made picture frames or poster frames. This is because custom frames generally are strung by a wire or cord, fitted by hand by picture framers. Ready-Made frames, on the other hand, are not usually fitted with wires or cords but have slip-on hangers, sawtooth hangers or D-Rings provided, fitted or staked to their backing boards. Let us then take a closer look at this inconvenience: why picture frames often hang tilted, uneven, or crookedly, on walls. The reason why this happens is quite simple. The picture frame is resting on only one hanging points, or, only on one nail. In these circumstances, the whole frame rests balanced on a fulcrum, or pivot point, situated at midpoint between the two ends. Because the whole weight of the frame is balanced on only one point, the smallest touch can move and unbalance the frame towards one end or the other, thus giving it its unbalanced, or crooked appearance. The frame doesn’t even have to be touched by anyone. A gentle breeze, or a happenstance gust of wind when doors or windows are open, are all enough to unbalance the finely balanced framed and skew it to one side or the other. Ok, so the problem is clear and it has been explained, now, how do we fix it? By far the most successful method is to hang the frame with 2 wall hooks, instead of 1, more or less as shown below:
  The closer the two nails, or hanging points are, the more the picture frame will then to tilt, rock or move. The further apart these are the less this will tend to happen. You can experiment as to the ideal placing, or position of the nails, by running two fingers, one at each end, under the hanging cord and lifting the frame. Another successful method, though not as much as the previous one, to stop picture frames from tilting, is to put rubber feet on them.
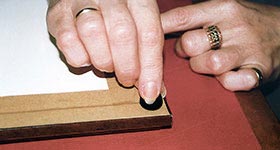
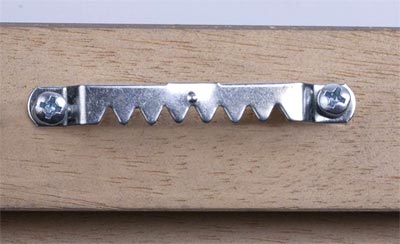
 They work by friction and help stop the frame from sliding sideways. These work best in conjunction with the double hanging points method described previously, but in its absence, and on their own, they do help stabilize the equilibrium of picture frames and to keep them level. Most office supplies and large department stores sell them. The can be clear, black, white or brown, round, circular, square, be made from felt, foam, PVC or solid rubber and usually, are self-adhesive or pressure-sensitive for ease of application. Yet another method, different form the preceding ones, is to use sawtooth hangers, but only with smaller photo frames or picture frames, say, no more than 30cms wide. One such hanger, already screwed to the back of a wooden picture frame,is shown below:
 The serrations on the metal hanger usually stop the frame from sliding or tilting sideways because a wall nail or hook gets stuck in one of the serrations and can’t easily move or jump out of it. Picture framer often have them and can sell you a couple, or tell you where to get them from. A last alternative may be to stick Blu Tack, self-adhesive, double-sided tape or even Velcro dots to the corners of picture frames. However this last option seems to mark, soil, stain or damage the wall paint, so it may not be for everyone. Nevertheless you now may know a little more more on how to to hang and keep your picture frames straight, even and level. We hope all this will help!


So, a great mystery in our household has been solved, how to keep those darn picture frames straight! The solution for me was the 2-hanging points tip. I re-hung nearly all my photo frames and picture frames in my house and they’re great, now they don’t move! And, by the way, the felt round dots also helped a lot.
I really like it when individuals come together and share ideas.
Great blog, stick with it!
Goodness me, I’ve been browsing online more than three hours as of late, but I never found any article so spot-on and helpful like yours that would solve my picture hanging problem. It is beautiful piece for me. In my opinion, if all website owners and bloggers made good content as you did, the world wide web can be much more helpful than ever before.