


If your photo frame glass has weird wet marks or spots it's most likely that you will see this unusual phenomenon when you put a glossy, brand-new photo inside a picture frame, or a photo frame, so that it touches the glass of the f rame. In fact, if you squeeze the glass and the back of the frame together, or run a fingertip hard across the back of the frame, you should see the mark, 'spot' or 'stain' increase or travel in the same spot or direction as your squeezing or your fingertip moves. And the more the photo touches the glass, the bigger the mark or 'stain' will appear too be. Release the pressure or lift you fingertip and the mark will lessen or disappear altogether. This will confirm to you that this occurrence is caused by the photo coming in contact with the glass. Those odd, seemingly "wet" or dark marks, or spots, you may see when a photo touches the picture frame glass are more properly called 'Newton's Rings'.
They're named after Sir Isaac Newton, the famous 17th century English physicist and mathematician who first scientifically analysed this phenomenon. That's interesting you might say, but how do these come about, you might also ask. In plain English, Newton's rings may be seen when air is trapped between two hard, smooth, straight level surfaces like glass and a flattened or mounted photograph. As ambient light enlarger passes through this air pocket it’s irregularly refracted or bounced up. This distorted, refracted light has an interference pattern first noticed by Sir Isaac Newton, hence the name. The rings resemble the circular rainbow effect of petrol or oil on water.
Ok, so now that you know what the problem is and what causes it, how do you fix it? Before we give you any advice, we need to remark that we deal this problem pretty much every week or so in the course of our picture framing work. In other words, our advice comes from empirical, rather than theoretical knowledge. Now, as with most things in life, there are two main ways of fixing this problem. The first one, is the correct, but expensive way.
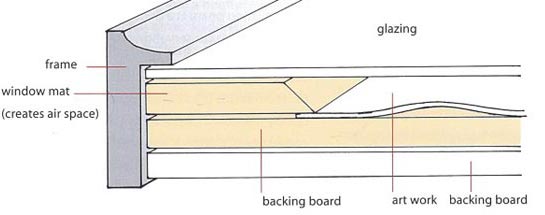
The second one, is not so correct, but it's not expensive at all, and almost free, actually. Both of these methods involve removing the cause and effect of the Newton Rings. Basically, both create an air space and lift the glass away from the photograph so that there's no longer contact between two and, thence, no marks or spots will appear. The first method consists of matting the photograph, that is to place a window mat ( not matt, mate or matte ) or a window mount, over the photo or artwork in question, and as illustrated in the diagram below:
The problem with the above solution is that you will probably need to buy a whole new, bigger photo or picture frame to accommodate the now matted and larger photograph. Often this will involve the additional cost of custom picture framing, which is not inexpensive. And what if you have not just one photograph, but a whole series to do? This is where the second method is a money-saver, if not a life-saver. The photo below illustrates the cheapest and easiest solution to the Newton Ring appearance problem. All you need to do is to lay some stationery tape over a few millimetres over and on top of the four edges of the photograph and as shown in the image below:
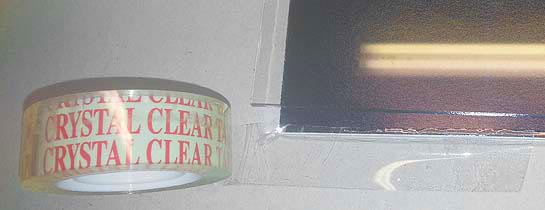
The thickness of the sticky tape is often sufficient to lift the glass away from the frame and just enough to stop air getting trapped and prevent the appearance of the annoying rings. Note that you only have to run or lay the tape along the sides just a few millimetres from the edges, 3 to 5mm will be ample. And if you're worried about the tape showing under the frame when to photo is fitted up or framed up, don't worry, it won't.
All picture frames or photo frames have rebates of at least 5m or more, so when the frame sits on top of the photo, all the 4 tapes sides will be hidden. We lastly mention that the two above-mentioned methods aren't the only ones to get rid of the Newton Rings. If you search the web long enough you'll come across other methods, like sprinkling special powders, spraying photos or even buying special, frightfully expensive Anti Newton Rings glass, in trying to obviate this unwelcome effect.
You're of course free to follow any method or try any remedy you wish. However, we repeat, we're picture framers, we deal with this problem just about every a day and a bit of patience with an inexpensive roll of sticky tape works for us fast and good, every time. In closing, our above-mentioned, taping method is only for ephemeral, inexpensive, unimportant, non-conservation photos or artwork. If the art that has to be framed has any sentimental, emotional, financial, artistic, historical or commercial value then this the second method, the one with the sticky tape, should not be used. You should instead research conservation framing resources here in this blog and elsewhere. Thank you for reading this post "Help! My new photo under the photo frame glass has weird wet marks or spots!"
Superb! This is really helpful. I am glad to have stumbled on this very informative post from obviously experienced picture framers. So many stores just sell frames and don’t know anything about picture framing. Well done!
I was sceptical about the suggestion of edge taping photographs at fist but I have to say that this little simple trick works. The only thing I found is that if one fits up the picture by pushing a tool down onto the backing board into the picture frame too hard then the glass touches the surface of the photo and the problems comes back. However this can easily be overcome by simply resting the staples of brad gun or point gun at the back of the board instead of pressing down. So the picture framing of my photos has now become a little easier and I can finish my photo frames a little quicker!